Born Pretty Holographic Glitter


How to use Born Pretty Holographic Glitter:

Born Pretty Holographic Glitter
This post is all about Born Pretty Holographic Glitter.

I was testing it and loved how it turned out so I decided to do a review and tutorial about it.

There is a full video tutorial for this on my YouTube Channel (Link Below) in which I use three of the glitter colours, Blue, Purple and Rose Red.                 

Born Pretty Holographic Glitter
I am not a professional nail tech and this is not a sponsored post, I just love doing my own nails and using different products to create amazing nails.


My social media links are at the bottom of the page if you would like to follow me to see more of my nails pictures, reviews and tutorials.

I am happy to answer any questions you may have and take any suggestions for future reviews or tutorials.
Some upcoming posts will include babyboomer nails, including a review of a nail art sponge I recently bought, some unicorn powders and holographic powders.


If you would like to watch the video for this tutorial on my YouTube Channel, then just click the link below:

Born Pretty Holographic Glitter: Video Tutorial and Review


Born Pretty Holographic Glitter Application:


Born Pretty Holographic Glitter

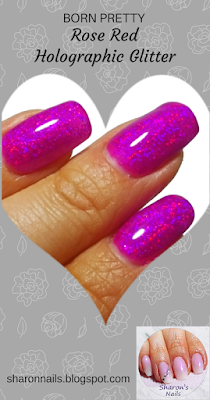
I applied the product as shown here using the rose red glitter.  I found that it worked best and the glitter shone the brightest when I used the tempered no wipe top coat from Elite99.  There is no reason why you couldn't use a regular gel top coat, I just find that not having to wipe the tacky layer away afterwards makes it a little bit easier.

I thought that all of the glitters were beautiful but to be honest, they were not all holographic as described.  The blue and the purple are simply glitters - but the rose red, which is really a dark pink does have some pink and blue colour shift to it.  Because of this I would say that this one does deliver on the holographic front.  The Rose Red is hands down my favourite of these glitters.

My honest opinion on these glitters is that they really are amazing for the price.  They are beautiful and are much more pigmented than a regular glitter you could buy anywhere.  If you wear this on your nails (especially the rose red) you are going to get lots of compliments, that's for sure.

Born Pretty Holographic Glitter

Please share your thoughts with me on these glitters, let me know if you have used them yourself, what method you used and what you thought.  If you don't have this glitter and would like to buy it, there is a link below to the glitters, the no wipe top coat I use and also the UV / LED Lamp which I will review in another post.

The next post will be how to use Holographic Powder from Elite99.  It is another of my favourite products because it is cheap but it actually works, and believe me I have bought a lot of cheap ones which show amazing photos but they don't actually give you that effect at all.  I have seen some of the more expensive holographic powders being sold for $45 so I was very surprised when I found one that worked for such a low price.

*** Where I bought these products ***

US or Universal Links (affiliate links):


UK Links (Affiliate Links):
   

That's it for this post - see you in the next one!

  ________________________________________________________________

My Social Media:

YouTube Channel: https://www.youtube.com/channel/UC123XacAlGgNpSE23VWO5tg

Instagram: https://www.instagram.com/sharons._nails/

Facebook Page: https://www.facebook.com/Sharons-Nails-1721305611241415/

Pinterest: https://www.pinterest.com/sharonsnails/pins/

Twitter: https://twitter.com/sharonsnails

Upgraded Elite99 Holographic Powder

How to use Upgraded Elite99 Holographic Laser Powder:

This post is a tutorial and review for Upgraded Elite99 Holographic Laser Powder.

upgraded elite99 holographic laser powder


upgraded elite99 holographic laser powder

I saw pictures online of stunning holographic nails and I wanted that look for myself.

I saw that some of  the holographic powders I had seen videos for were over $30 which I was not willing to pay.  If I can get a cheaper product to work the same as the more expensive ones then I will always try to find it!


I tried a few well known brands which were cheaper but didn't work for me.
 I tried all kinds of application methods and different tools to get them to work but it just wasn't happening.
I had almost given up when I found this one.

 I do just need to say that this company have not paid me to give them a positive review, I bought the product myself and found it worked and want to share it with people who cannot afford top notch nail art products (like me!)


I recorded a video tutorial which I have linked below if you would like to see the application in real time:


Upgraded Elite99 Holographic Laser Powder - Video Tutorial:


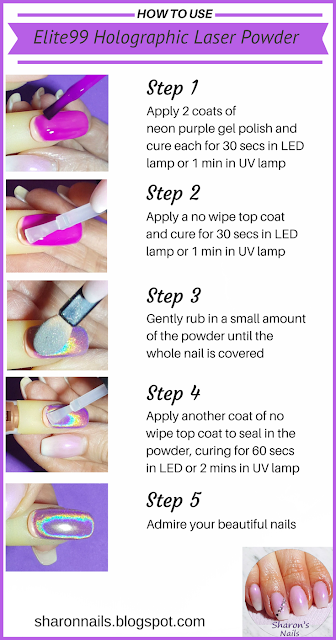
Upgraded Elite99 Holographic Laser Powder Application:


upgraded elite99 holographic laser powder

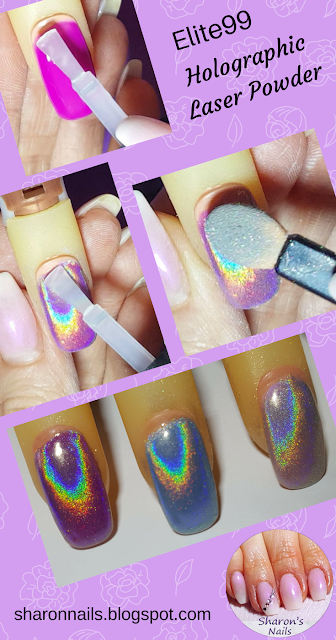
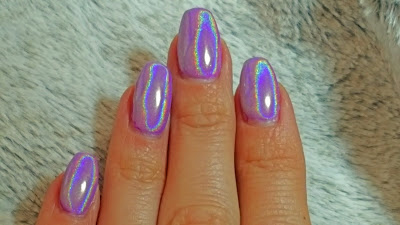
 I applied the powder as shown here, but I used it on three different gel polish colours to show you how it could create different looks.  My favourite has to be the purple and I put this on my own nails and it lasted for two weeks without any problems.

The Gel polishes I used were:
(Links to all products below)

1.  Elite99 Neon  Purple 1556
2. CCO Azure Wish (light blue)
3. Bluesky 80502 (french kiss)

I also use Bluesky no wipe top coat and use this to rub the powder into and then use it for the final topcoat.  I like this one because it is quite tacky when cured and is easy to rub the powder into.

I would not recommend using a tempered no wipe top coat as it won't let you rub anything into it, I have tried and failed!

My unbiased opinion is that this powder is amazing for the price, it really does what you expect it to do.  I liked to have the gel polish colour showing through the powder which was why I only rubbed a small amount in, but if you want that silvery opaque holographic look then all you need to do is use more powder.


upgraded elite99 holographic laser powder
I have included links to products I used below but unfortunately I can't find the french kiss gel polish in the US, it is just a pale pink though so I think any other would work just as well.

Please let me know if you have used this powder and if it worked for you.  What colour do you like to use it with?  If anyone would like to suggest a product for review or would like to send me photos of their experiences with this powder I will share them on this blog.

My next post is going to be how to use Unicorn Laser Powder from Kuka, and again I will use it over different colours and let you know the application method that I preferred.

*** Where I bought these products ***


UK Links:

           - Sorry can't find a link for this in US!

That's it for this post - catch you in the next one!

  ________________________________________________________________

My Social Media:

YouTube Channel: https://www.youtube.com/channel/UC123XacAlGgNpSE23VWO5tg

Instagram: https://www.instagram.com/sharons._nails/

Facebook Page: https://www.facebook.com/Sharons-Nails-1721305611241415/

Pinterest: https://www.pinterest.com/sharonsnails/pins/

Twitter: https://twitter.com/sharonsnails